3. User Interface
In the following the various components of the user interface are introduced and their usage described. The UI should be sufficient for most common use cases. However, if functionality is missing, user created modules can provide these. Examples of how to achieve certain tasks using the tools provided by Joystick Gremlin are shown in 5. Examples.
Table of Contents
- Overview
- Virtual Buttons
- Activation Conditions
- Containers
- Actions
- Profile Settings
- Modules
- Tools
- Options
- Command Line Options
3.1 Overview
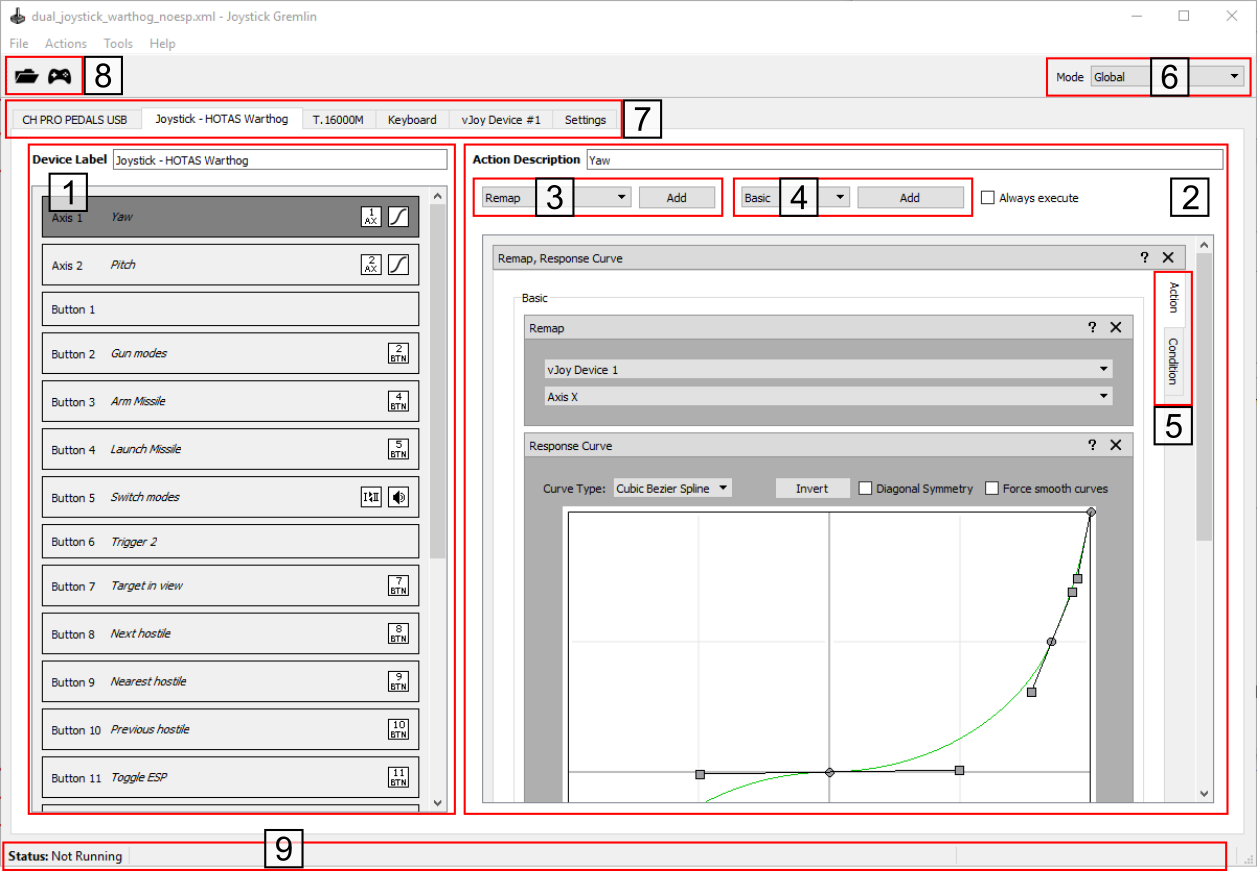
The following is a short overview of the different components that make up the main user interface, shown in the following image.
 Joystick Gremlin UI
- Overview of all the inputs available for a given physical device. The small icons on the far right of each input indicate the type of actions associated with the input. The icons and their meaning are summarised in the table below.
- The right hand portion of the UI shows the list of containers and actions associated with the currently selected input. This panel allows configuring the actions to execute when the physical input is used.
- This drop down lists all available actions for this type of input. Pressing the "Add" button will embed the selected action in a basic container.
- This drop down contains the available containers for the currently selected input. Pressing the "Add" button inserts an empty container of the desired type.
- Each container can contain up to three tabs that handle various configurations. The Action tab allows the basic configuration of the actions. The Condition tab allows fine tuning under which conditions the action or container should be executed. Finally the Virtual Button allows configuring an axis or hat to be used like a button.
- The mode section allows changing the mode currently being configured.
- Each tab represents an individual device that is currently connected to the computer. The "Settings" tab allows configuring properties for the entire profile.
- Tool bar which holds the most commonly used actions, from
left to right:
- Open an existing profile.
- Activate Joystick Gremlin, when active the button is pressed and a green icon is shown. This also changes the status bar display. Pressing the button while Joystick Gremlin is running will disabled it again.
- The status bar shows whether or not the program is currently running a profile. If the program is running the currently active mode is shown as well if code execution is paused. If the input repeater is active it's status is also shown in the far right.
The following table shows the different icons and the actions they represent.
| Cycle modes | Description | ||
| Macro | Map to keyboard | ||
| Map to Mouse | No-Op | ||
| Pause | Play sound | ||
| Remap axis | Remap button | ||
| Remap hat | Response curve | ||
| Resume | Split axis | ||
| Switch mode | Switch to previous mode | ||
| Temporary mode switch | Text-to-speech | ||
| Toggle pause & resume | |||
3.2 Virtual Buttons
Each input has a natural behaviour or type of states it can be in. Certain actions, however, require a binary state reflecting that of buttons, i.e. pressed and released. In order for axis and hat inputs to support this they require to specify the condition under which they should be considered pressed and released, effectively turning them into a virtual button.
This is often needed, for example when using individual hat directions as buttons when a game doesn't support mapping individual hat directions. A common use with axis is to enable afterburners when the throttle reaches 100% thrust. This type of situations are where a virtual button is used. The details of these activation conditions is covered next.
Button and Keyboard Key
As these inputs are already binary there is no virtual button configuration needed.
Axis

Actions associated with axis inputs have a range based setup which simulates a button press when the axis enters the specified range and releases the virtual button when it leaves the range. In addition to being able to specify the range for the button you can also specify a direction in which said range has to be entered if desired. This allows triggering two different actions for the same range depending on the direction it is traversed.
Hat

The eight directions of POV hats can be treated as states in which the virtual button is considered pressed. It is possible to select multiple directions at once and any of the selected directions will be considered as part of a single virtual button.
3.3 Activation Conditions
Sometimes executing actions when a physical input is pressed is doesn't provide enough control over the execution of actions. To provide additional control over the execution of actions Gremlin allows the user to specify conditions under which action can or cannot be executed.
Typical usage scenarios for this would be the use of a modifier or shift key to change what a particular physical input does in certain situations. Another common case is to trigger different actions when a button is pressed or released, for example on throttles with switches rather then buttons.
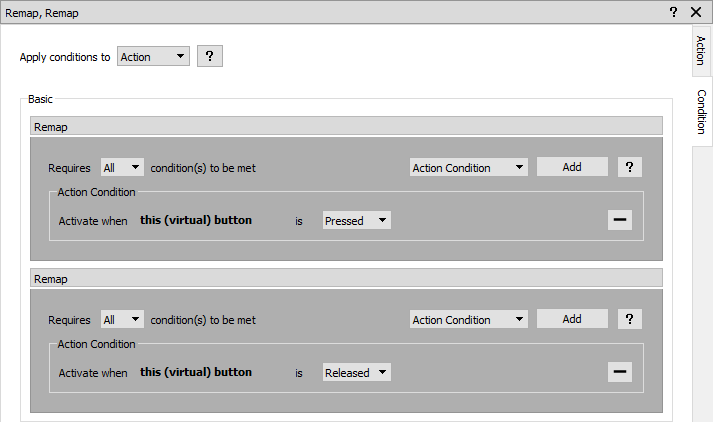

As mentioned in 3.1. Overview the conditions are configured in the condition tab present in every container widget. The tab allows placing conditions on either every action individually or on the container as a whole. These conditions will dictate whether or not a particular action or container is executed when the corresponding physical input is used.
There are three types of conditions available:
- Action
- The Action condition checks whether or not the physical or virtual button triggering the action or container is pressed or released. This enables for example to run a macro when the physical button is released rather then when the button is pressed.
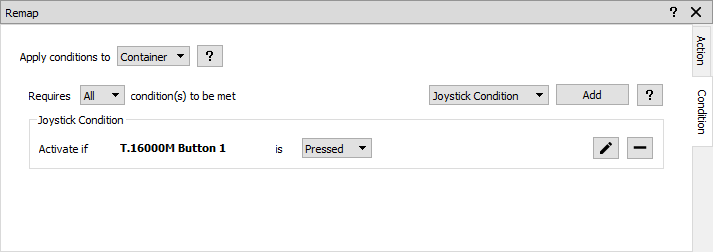
- Joystick
- The Joystick condition allows to use any physical joystick input as a condition. For buttons this is whether or not the button is pressed, for hats this is whether a particular direction is pressed, and for axis whether or not it currently is inside or outside a specified range.
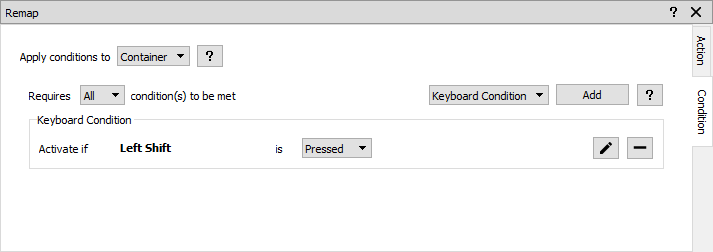
- Keyboard
- The Keyboard conditions allows checking whether or not a particular keyboard key is pressed or not. This would typically be used to implement a modifier or shift key. To trigger different actions depending on the state of a key.
3.4 Containers
As the name implies containers are designed to hold one or more actions. In addition to grouping actions together a container can also apply further logic to groups of actions. Currently the following three types of containers exist.Basic

This container simply holds a group of actions without any further specific functionality. This is the default container and suitable for most situations.
Chain
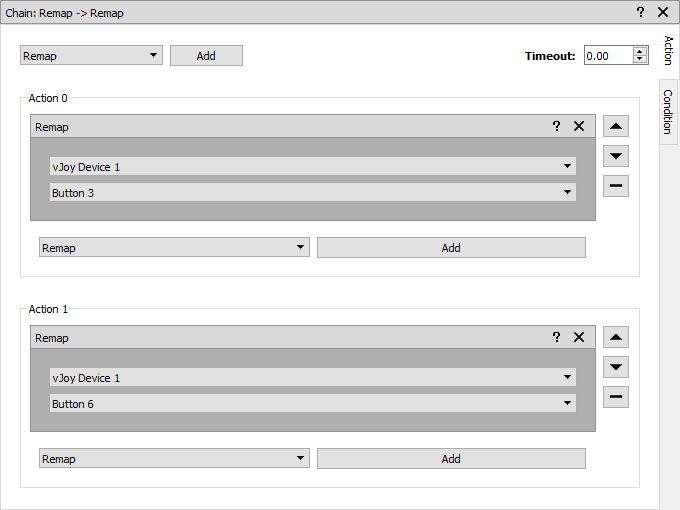
This container holds several independent groups of actions. Each time the physical action with which this container is associated the next action group is executed. When the last group in the chain is reached the first group is executed again. Additionally, a timeout can be set after which the chain is reset to the first entry.
Double Tap
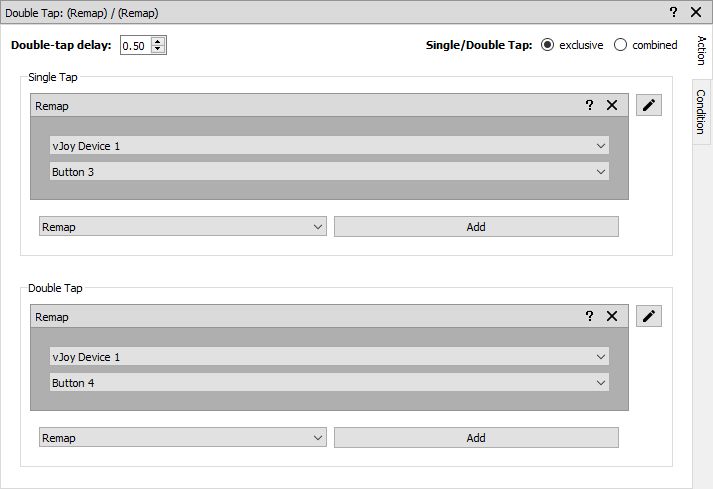
This container holds two groups of actions, the first group is executed on a single button press while the second one is executed on a double press. The Double tap delay allows the modify the double tap speed, while Single / Double tap configures whether the single tap action is active together with the doble tap action or not. In the exclusive mode, the single tap action will be executed with a delay corresponding to the double tap delay.
Hat Buttons
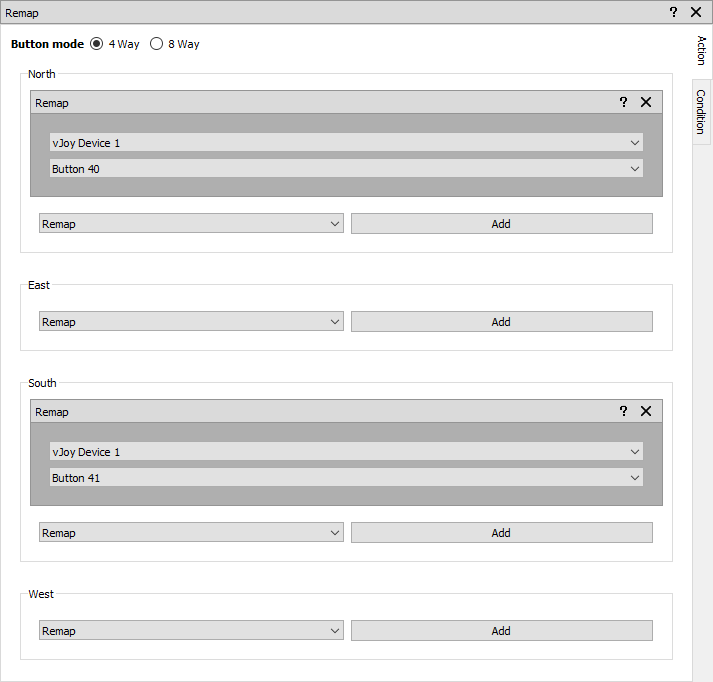
This container allows a hat to easily be mapped onto four or eight individual action groups. Each action group can contain any combination of actions that are valid for buttons and will be executed when the corresponding hat direction is triggered.
Smart Toggle
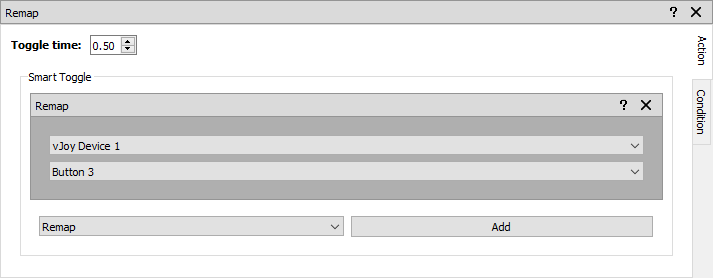
The smart toggle container allows for a single group of actions that are have on and off states, such as remap and map to keyboard to be used in two manners. If the input is held down the action will perform as a typical remap action would, i.e. staying active as long as the input is pressed. However, when a short button press is detected, specified by the Toggle time then the first such press toggles the down state, i.e. holding the action down, and the second short press releases the action again.
Tempo
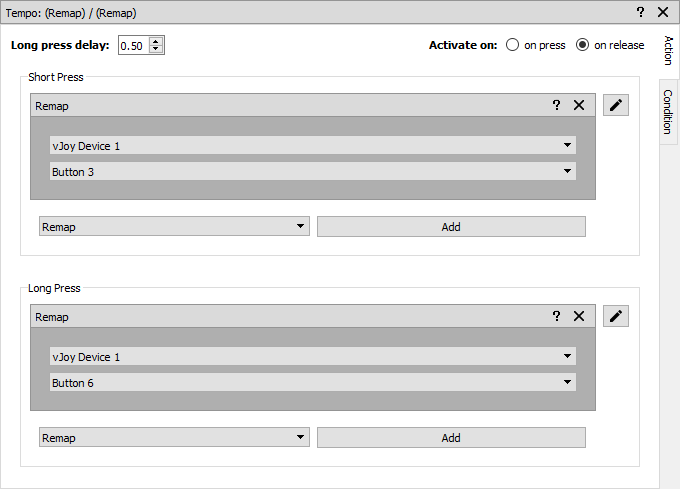
This container holds two groups of actions that get executed under different conditions. The first one is run when the input is pressed for a duration shorter then the specified delay. The second group is run when the input is pressed for longer then the specified delay. Whether the first group is executed with the input being pressed or only when it is released can be controlled by the activation setting.
3.5 Actions
As described in Section 1.2, each input, such as axis, button, hat, or keyboard key, can have multiple actions associated with it. However, not all inputs have access to the same types of actions as they are not applicable to them. In the following all available actions are described.
Each action has an activation condition associated with it, see Section 3.2, which can be used for fine grained control over them. Additionally, each input can also be configured to be always executed by checking the Always Execute box, see item 2 in the above image. Enabling this option results in actions associated with that input to be performed even if execution of callbacks is paused. This is mainly useful for resuming when execution has been paused.
Remapping
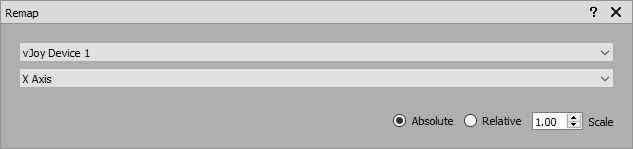


The remapping actions enable the user to propagate inputs from a physical joystick input to an equivalent vJoy input, i.e. axis to axis, button to button, and hat to hat. This allows the merging of multiple physical devices into a single device.
In the case of axis remapping the condition can be used to press a vJoy button while the axis in a certain range and release it once the range is left. This could for example be used to engage afterburners when a throttle is set to greater then 95%.
A remap actions for an axis can be configured in two ways: absolute, the physical input dicates the virtual output value directly, and relative, the physical input dicates the rate of change of the virtual output.
In most cases button remap actions should always trigger, i.e. on button press and release, as otherwise the forwarding to vJoy is incomplete.
Response Curve
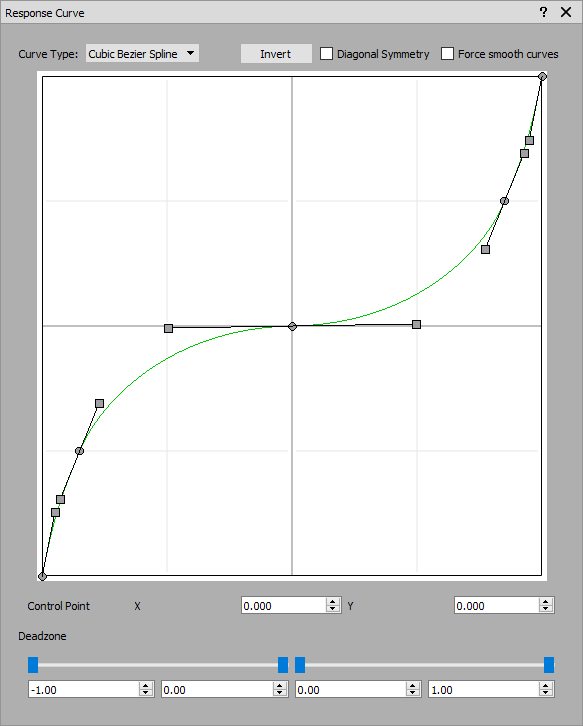
The response curve dialogue allows the customisation of the response produced by the joystick using the curve editor. The shape of the curve is controlled using a set of control points.
A new control point is added by a double left click in an empty area of the curve editor. Removing an existing control point is achieved by selecting the desired point and pressing the Del key on the keyboard. A single left click on a control point will mark the point as active. An active point can be dragged in the window to modify its position. Alternatively, the text fields below the curve editor allow for precise numerical control of the position.
Finally, the dead zones for the axis can be defined using the sliders and input fields at the bottom of the dialogue. The fields and sliders control the full deflection dead zone (1st and 4th field from the left) as well as the centre deflection dead zones (2nd and 3rd field).
Currently there are two types of response curve types available which are selected from the drop down menu at the top of the widget:
- Cubic Spline
- A simple spline with only control points dictating locations the curve has to pass through. No control over the shape is provided.
- Cubic Bézier Spline
- A more complex spline with control points and "handles" that can modify the shape of the overall curve. Importantly this allows to control how the curve approaches the end points of the curve.
A response curve mapping action always needs to be paired with a remap action, as otherwise the transformation will not have any effect.
In order for response curves to work properly the game has to be configured to use a linear 1:1 curve, as otherwise the two curve settings will interfere with each other producing undesirable results. This also applies when using vJoy response curves, if they are not linear the output produced by this action will be further modified.
Macro
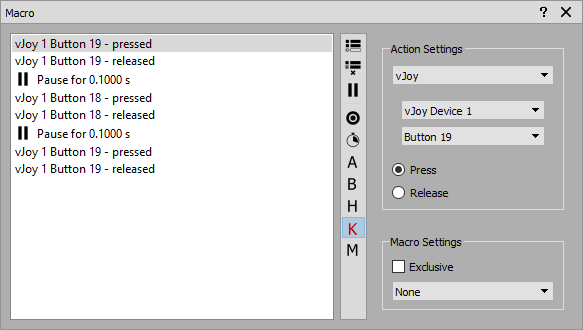
The macro dialogue allows the creation of macros capable of emitting keyoard, mouse, and joystick events with timing information between individual events.
Adding new keystrokes to a macro is done by pressing the Record button, after which all keystrokes will be recorded sequentially. To stop the recording simply press the Record button again. A pause can be added by pressing the Add Pause button, which will insert a pause after the currently selected entry. The length of the pause can be modified by double clicking the entry. Selecting an entry allows it to be moved up and down using the Up and Down buttons.
The stopwatch icon ![]() allows recording the input
delays when recording a macro. The buttons with labels
Axis, Button, Hat,
Keyboard, and Mouse allow enabling or
disabling those specific input events when recording a macro.
allows recording the input
delays when recording a macro. The buttons with labels
Axis, Button, Hat,
Keyboard, and Mouse allow enabling or
disabling those specific input events when recording a macro.
Clicking on any entry in the action list allows modifying that entry as appropriate for the input. Alternatively the entire action can also be changed through the dialog on the right hand side of the action. In the bottom right corner, the Macro Settings section allows changing the behaviour of the macro. Exclusive ensures that no other macro is running when this one is executing. The dropdown allows selecting a repeat mode for the macro.
- None
- The macro is executed exactly once.
- Count
- The macro is executed as often as specified with the specified delay between subsequent executions.
- Hold
- The macro is executed as long as the (virtual) button is held down with a configurable delay between subsequent executions of the macro.
- Toggle
- On the first press of the (virtual) button the macro is started and will repeatedly execute with the specified delay between executions until the (virtual) button is pressed again.
Each macro is executed independently, which means that multiple long running macros can have their key presses interfere with each other.
Map to Keyboard

The map to keyboard action allows an arbitrary keyboard key sequence to be linked to a single physical input, such as a button. The specified keyboard sequence is pressed when the physical button is pressed and released when it is released.
Map to Mouse


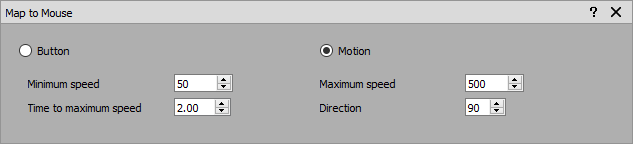
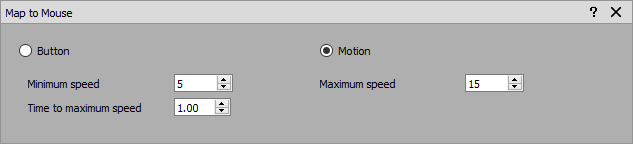
This action allows using joystick axes, button, or a hat to control the relative motion of the mouse cursor as well as press mouse buttons. The speed values are in pixels per step while the acceleration on the hat regulates how long it takes to go from the slowest to the fastest movement speed.
Pause, Resume & Toggle


The pause, resume, and toggle actions control whether or not Joystick Gremlin executes callbacks when inputs are used. When the application is paused only inputs that were configured to always execute will be executed.
In order for the resume and toggle actions to be useful they have to be defined as always execute, as otherwise it will be impossible to resume from the paused state.
Change Mode

This action will change the currently active mode of Joystick Gremlin to the one selected from the drop down list.
Temporary Mode Switch

This action will change the current mode to the one specified when the button or button-like input is pressed. When the input is released the mode will automatically be changed back to the previous one.
Switch to Previous Mode

This action changes the current mode to the previously active one.
Cycle Modes
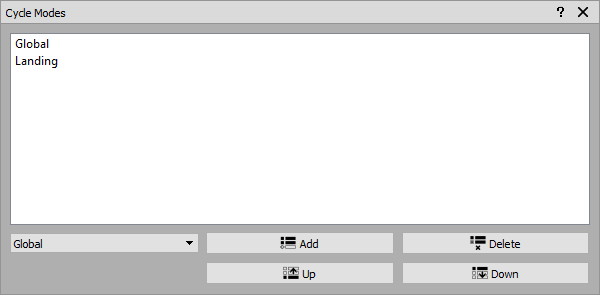
This action allows the configuration of a list of modes that are cycled through consecutively with each activation. In case that the currently active mode is not part of the list the first mode in the list will be activated.
New modes can be added by selecting the desired mode in the drop down list and pressing the Add button. The currently selected mode can be deleted by pressing the Delete button and moved up or down with the Up and Down button respectively.
Split Axis
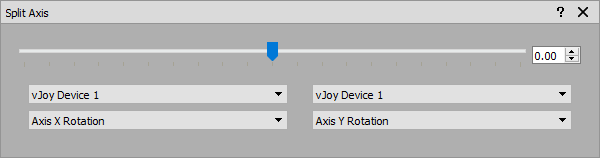
This action allows splitting a single physical axis into two virtual ones. The value at which the physical axis is split can be adjusted by the user.
Play Sound

This action allows the specification of a sound to be played with the desired volume when the action is triggered. Only one sound can be played at a time and new sounds will interrupt currently running ones.
Text to Speech
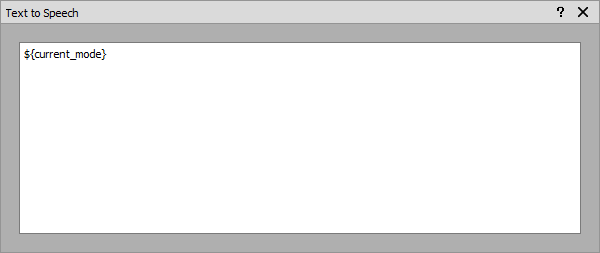
This action allows arbitrary text to be spoken by Joystick Gremlin. The system knows how to replace some values with current information. The currently known replacements are listed below.
| Expression | Replacement |
|---|---|
| ${current_mode} | The name of the currently active mode |
The text segments are spoken in the order they are requested and as such queueing multiple long segments can lead to significant delays between them being triggered and played.
No Operation

Sometimes one wants an empty or no operation action that can be used as a place holder. For example to use a tempo container with no short press action. This action allows having an action inside a container without it doing anything.
3.6 Profile Settings
The Settings tab allows configuring settings that apply to the entire profile. This includes:
- Defining how the initial mode is selected
- Default delay between macro actions
- Defining which vJoy devices are to be treated as physical inputs rather then outputs
- Configuring the initial value of vJoy output axis on activation
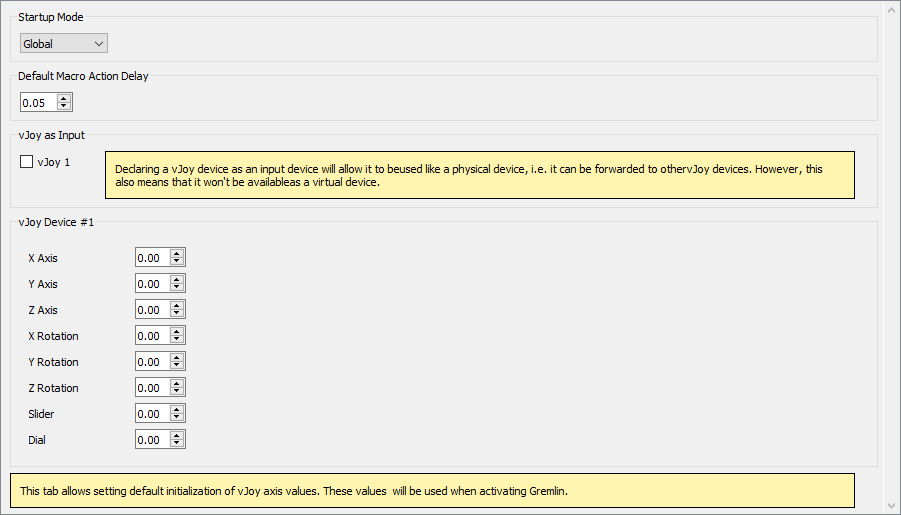
Startup Mode
By default Gremlin uses a heuristic to figure out which mode to select upon activation of a profile. The mode selected is either the one that was active upon deactivation of Gremlin or the first mode without a parent in alphabetical order.
If this heuristic is not suitable the drop down allows the selection of any of the modes present in the profile to be selected as the initial mode.
Default Macro Action Delay
The macro system will inject a fixed delay between individual non-pause actions. Certain games may require a longer delay between actions which can be set using this option.
vJoy as Input
In certain scenarios it can be desirable to have Gremlin treat a vJoy device as an input, e.g. when another program feeds a vJoy device but doesn't offer some features that Gremlin does. By checking the box next to the vJoy devices it will be treated as an input rather then output device.
When a vJoy device is declared as an input device Gremlin will no longer show it as a target in the Remap action and other similar actions. However, a tab for that vJoy device will appear which allows adding actions to all the axes, buttons, and hats of the vJoy device remapping to other vJoy (output) devices.
This features was newly introduced in Release 11 and as such may still contain bugs and unforeseen interactions with other parts of Gremlin.
Initial vJoy Axes Values
By default Gremlin sets all vJoy axes to a value of 0.0, i.e. centered. In some situations this is not ideal, for example a throttle, and as such this section allows setting the initial value to use for each axis.
3.7 Modules
The Modules tab allows adding and configuring user plugins that can provide behaviour that is complicated or impossible to achieve through the UI otherwise.
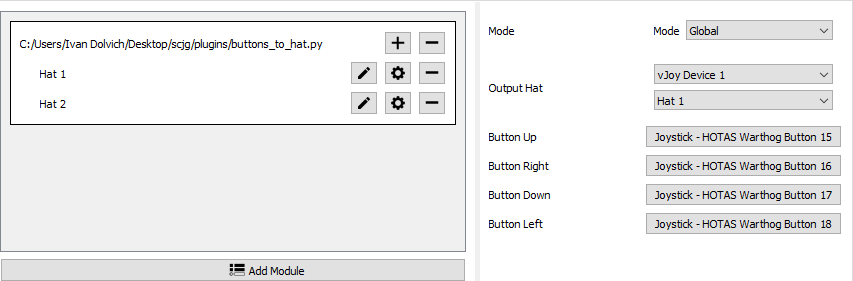
User plugins are the next development of the initial custom modules. Custom modules allowed extending Gremlin with arbitrary code. However, they were not very user friendly as they required code to be modified for simple adaptations to a user's setup. The new user plugins can be configured directly in the UI and can be used multiple times if the same functionality with slightly different settings is needed. An introduction into how to write such plugins can be found in 4. User Plugins.
Adding a new plugin is achieved by clicking on the Add Module button and selecting the appropriate file. Once a plugin has been added additional instances can be created via the plus sign. Existing instances can be renamed via the pen icon, and removed by clicking on the minus sign. To configure an instance, press the cog icon.
The configuration of a plugin instance allows setting all the exposed variables of the plugin. Each of the variables presents a UI appropriate to the particular type of input needed.
3.8 Tools
In the following section the various tools provided by Joystick Gremlin are described. They can be accessed via the Tools and Actions menus.
Mode Manager
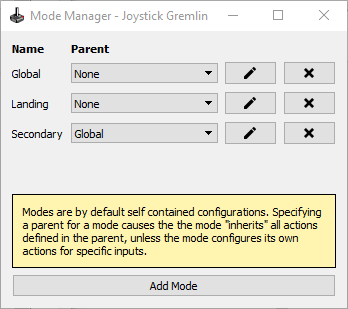
The mode manager, accessed via Tools > Manage Modes, allows users to create new modes, delete existing ones and define which mode inherits configurations from others. Pressing "Add Mode" adds a new mode, pressing the button to the right of each mode with the x on it deletes it, and the button with a pen icon allows renaming a mode. Finally, using the drop down menu each mode can be configured to inherit from one other mode by selecting its name or not inheriting from any mode by selecting the "None" entry.
A mode that inhertits from another is typicalled called a child and will perform the same actions as its parent when no actions are defined for a particular input.
Merge Axis
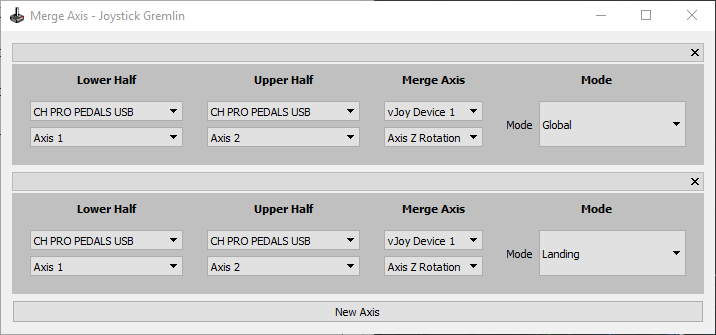
This dialog allows the selection of any arbitrary two physical axis and the virtual axis their combined output should be assigned to.
Input Repeater
When enabling the Input Repeater option, while Joystick Gremlin is active, via Tools > Input Repeater, Joystick Gremlin will repeat the last remapped input after a short wait period. This allows button presses and axes movements to be mapped in-game when the game detects the physical device's inputs instead of the virtual ones. The status bar provides information about the current action of the input repeater when activated.
Device Information
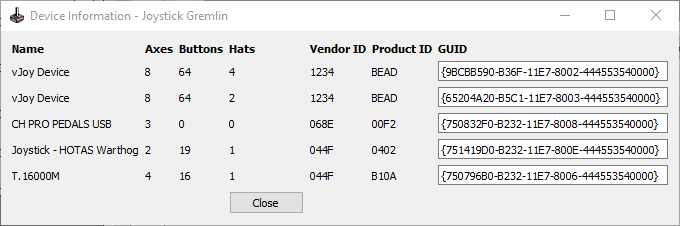
Information about connected devices can be accessed via Tools > Device Information. This window provides an overview of the devices known to Joystick Gremlin, listing the name as well as some basic information about each device. The Vendor ID and Product ID represent the USB information about this device. The GUID is an identifier which is unique to each physical device on a particular Windows installation and is used by Gremlin to identify the different devices.
Calibration
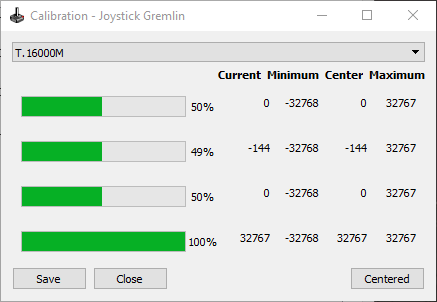
The axes calibration screen, accessed via Tools > Calibration, allows the calibration of connected devices independent of Windows. The window shows the current, minimum, centre, and maximum value for each analogue axis of the selected device. To calibrate the axes simply move them through their full range of motions and press the Centred button when all axes are centred. Once done press Save to save the calibration of the currently selected device to the configuration file.
Input Viewer
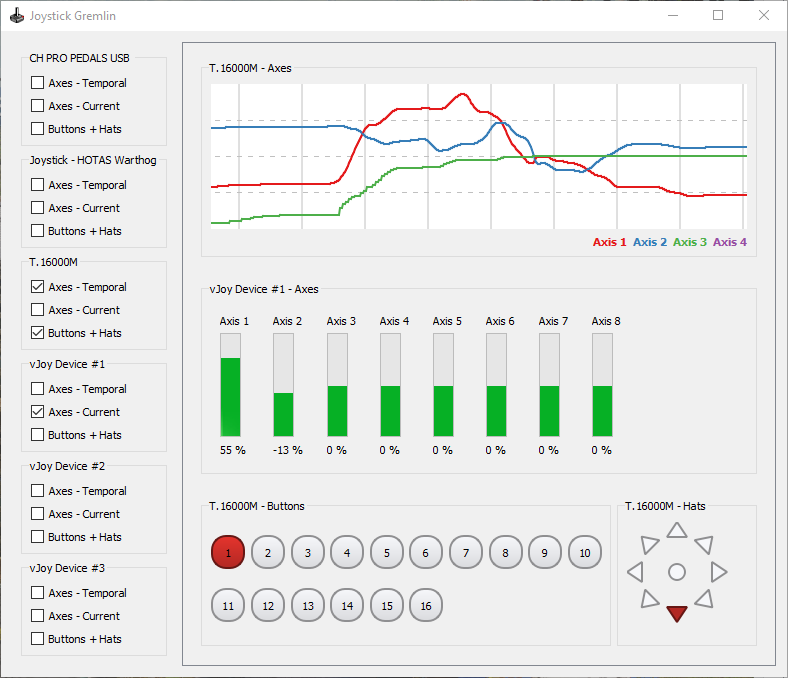
The input viewer allows visualizing the input from the physical as well as virtual devices. The window shows recognized devices and data visualizations for their inputs on the left hand side while the visualizations themselves will be shown in the right hand side of the window.
Cheatsheet Generation
To help remember complex setups Joystick Gremlin has the ability to create PDF and HTML cheatsheets of the current profile. The output lists for each mode the actions of the available devices together with the user provided description.
Create 1:1 Mapping
In order to make the initial setup quicker Joystick Gremlin can create a 1:1 mapping for the user. To do this select the entry from the Actions menu. This will result in each input being assigned the next free corresponding action, i.e. buttons are mapped to buttons and axes to axes.
Profile Creator
In order to enable easier sharing of configurations, even if different devices are used, the Profile Creator allows creating a new profile from an existing one. When started the tool asks for a profile to use as a template and then presents all the bound actions within to the user for binding to their particular devices.
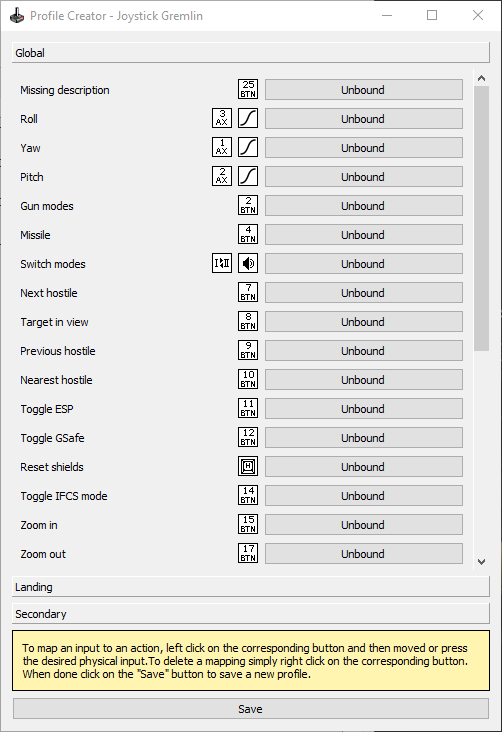
- Description of the action
- Type of actions used
- What input the action is currently bound to
This tool is only capable of binding actions defined via the UI and if custom modules are used in a profile those will not be automatically adapted to the new devices used.
Log viewer
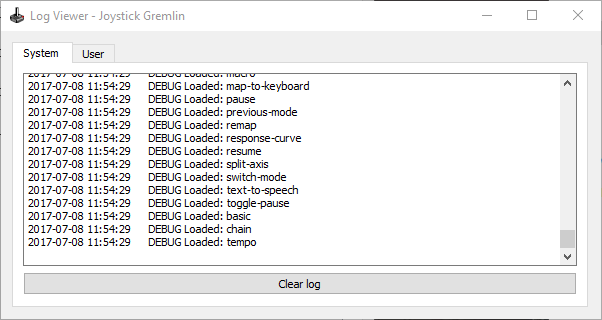
The log viewer can be accessed via Tools > Options and allows easy viewing of both the system and user log files. The display is updated whenever the content of the log changes. Clearing the entire log is alos possible from this screen.
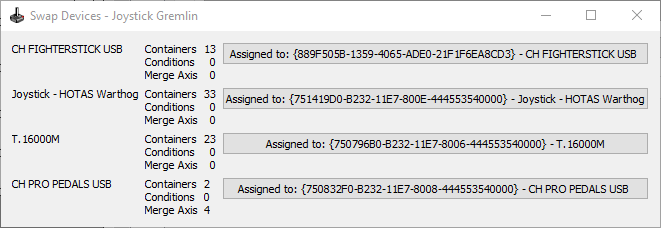
Swap Devices
While Gremlin should be able to always differentiate between physical devices there may be occasions when moving configurations associated with one device to another. This tool permits moving actions, macros, and conditions associated with one device to be moved to another connected one.
3.9 Options

There are several user controllable options in Joystick Gremlin which can be controlled via the options dialogue, accessible through Tools > Options.
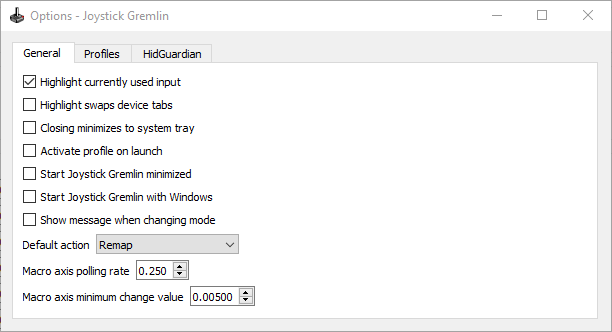
General
The following options are accessible via the General tab:
- Highlight currently used input
- This option causes Joystick Gremlin to automatically select the input configuration matching the physical input's being used.
- Highlight swaps device tab
- With this option enabled, activating any physical input will swap to that device's tab if it is not the current one
- Closing minimizes to system tray
- Instead of quitting the application when it is closed, Joystick Gremlin is simply minimized to the system tray.
- Activate profile on launch
- This option causes Gremlin to activate the profile as soon
as the program has started.
- Start Joystick Gremlin minimized
- Launches Joystick Gremlin minimized to the system tray instead of opening the main window.
- Show message when changing mode
- Displays a windows notification when the mode is changed.
- Default action
- Sets the action to be pre-selected in action selection drop down menus
- Macro axis polling rate
- This sets the rate at which axis values are recorded in the macro editor.
- Macro axis minimum change value
- This determines the minimum axis value change required to record a new entry in the macro editor.
Profiles
The Profiles tab exposes the following options:
- Automatically load profile based on current application
- This option makes Joystick Gremlin to automatically load and activate the profile assigned to the currently active application.
The drop down menu and input fields allow selecting the executable and the profile associated with it. When an executable specified in this list is active the profile associated with it is automatically loaded and activated. Once the profile stops being the active one Joystick Gremlin is automatically stopped.
The edit icon allows changing the path of the selected executable or to enter a regular expression that will be used to match against the foreground process. Joystick Gremln will first attempt to find a direct match for an existing file and once this fails attempt to use the remaining entries as regular expressions, picking the first successful match.
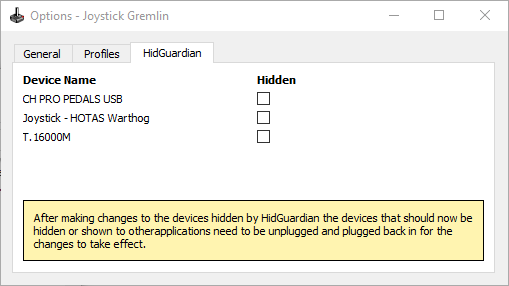
HidGuardian
HidGuardian is a tool that solves the problem of a game seeing both the physical device and the virtual device at the same time and processing these inputs in unwanted ways. HidGuardian is capable of hiding those physical devices from all non whitelisted programs, thus effectively allowing games to be fooled into believing only the virtual devices exist.
If Gremlin is started with admin priviliedges and HidGuardian (ideally installed through this tool) is present this tab allows hiding and unhiding devices. Once a device's status was changed it has to be unplugged and replugged for HidGuardian to be able to use it.
This feature as well as HidGuardian are still in development. In fact HidGuardian is undergoing rework and as such newer versions will not work with Gremlin and this feature will be updated once HidGuardian has stabilized.
An alternative to HidGuardian, which is no longer in active development, is HidHide from the same author. HiHide is in active development and appears to work well even without additional convenience functionality provided by Gremlin.
3.10 Command Line Options
Joystick Gremlin allows controlling the following options via command line parameters:- Loading a specific profile
- Enabling the program on launch
- Starting Gremlin minimized
Profile Loading
By passing the--profile parameter followed by the path to the
profile to load Joystick Gremlin will load the specified profile.
Enabling on Launch
Passing the--enable flag will enable Joystick Gremlin once the
program has been fully loaded.
Start Minimized
Passing the--start-minimized option to Joystick Gremlin will
cause it to launch minimized.