Actions
Actions are what allow Gremlin to perform all its functions. They can be arbitrarily complex and can also trigger other actions. Not all actions are compatible with all inputs and each action decides by itself which input types is can work with. The following provides a description of all available actions.
Table of contents
Chain
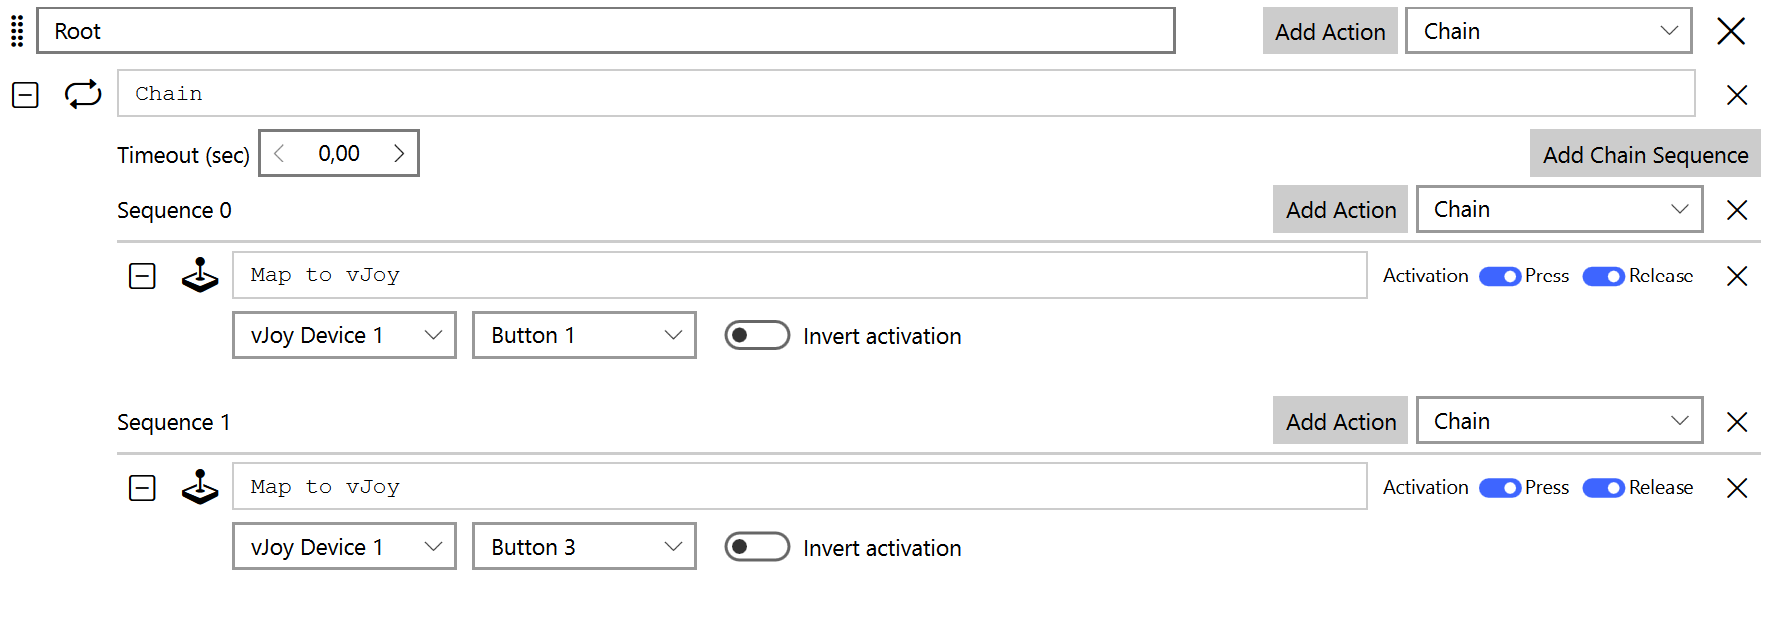
This action holds several independent groups of actions. Each time the action is activated the next group’s actions are executed. When the last group in the chain is reached the first group is executed again. Additionally, a timeout can be set, after which the chain is resets to the first entry.
Change Mode
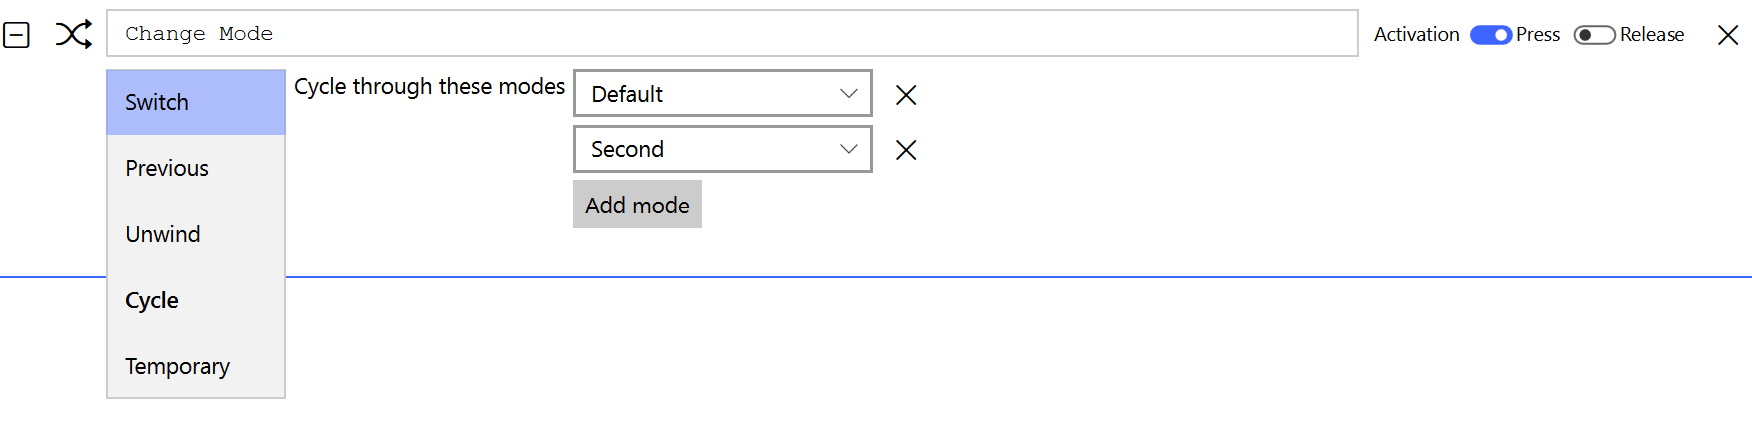
Allows controlling which mode Gremlin is in at any point in time. In the simplest use case a user simply swaps between named modes. However, significantly more complex setups are possible. Internally Gremlin has a stack of modes that is used to drive the entire mode change functionality. The following actions are available to interact with it:
- Switch
- Change the current mode to the specified one, adding the new mode to the top of the stack.
- Previous
- Changes to the previously active mode, effectively swapping the top two elements of the stack. Repeatedly calling this only swaps between the last two active modes.
- Unwind
- Swaps to the previous mode on the stack, in contrast to the Previous operation this discards the last active mode, effectively unwindinw the mode stack.
- Cycle
- Each activation of the action switches to the next mode in the list. Once a cycle is detected it is resolved based on the resolution mode selected in the options screen.
- Temporary
- Switches to the specified mode as long as the triggering input is pressed. Upon release of the triggering input the temporary mode is exited, if it is the currently active mode.
Condition
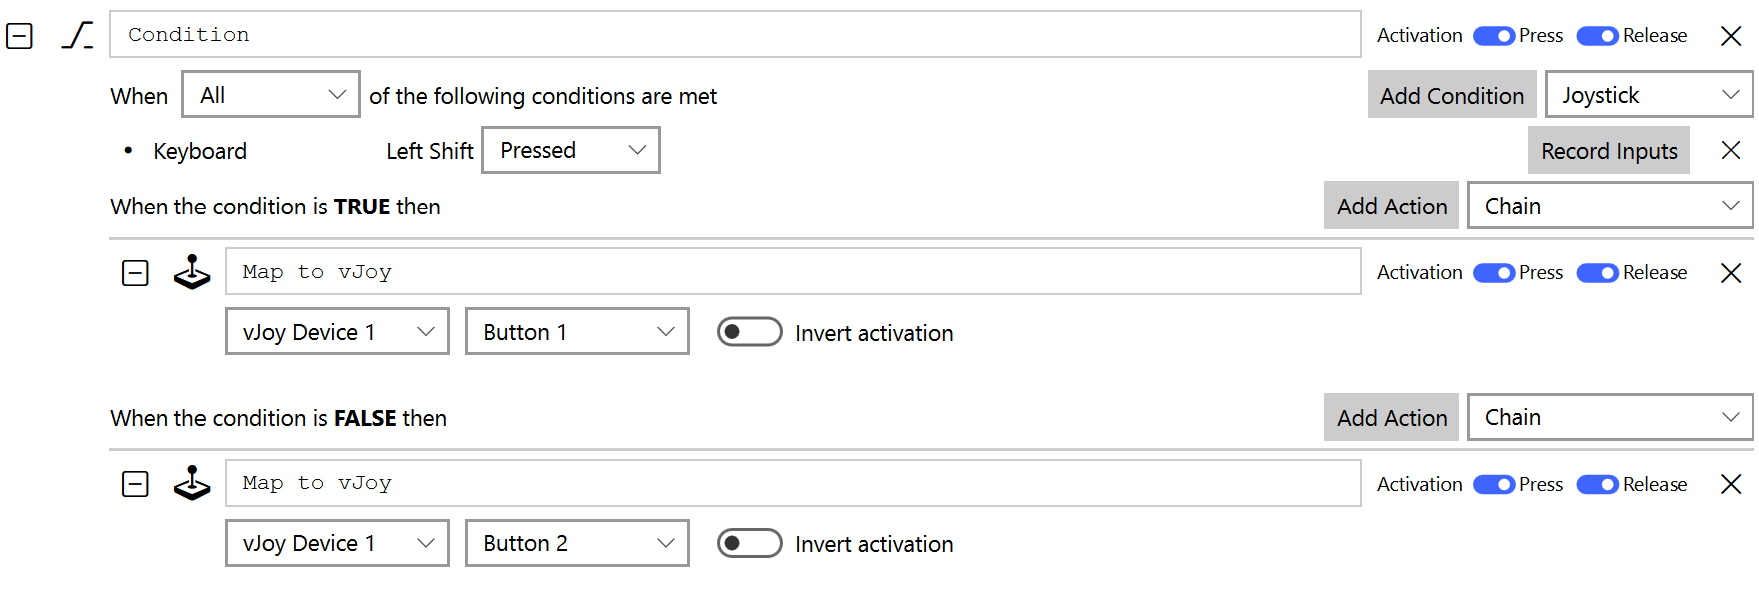
The condition action consists of three parts.
- The configuration of the condition to evaluate.
- The set of actions to execute if the condition evaluation is true.
- The set of actions to execute if the condition evaluation is false.
Depending on the outcome of the evaluation of the conditions when the action is activated either the true or false actions are executed.
Description

Allows providing additional description about a set of actions.
Double Tap
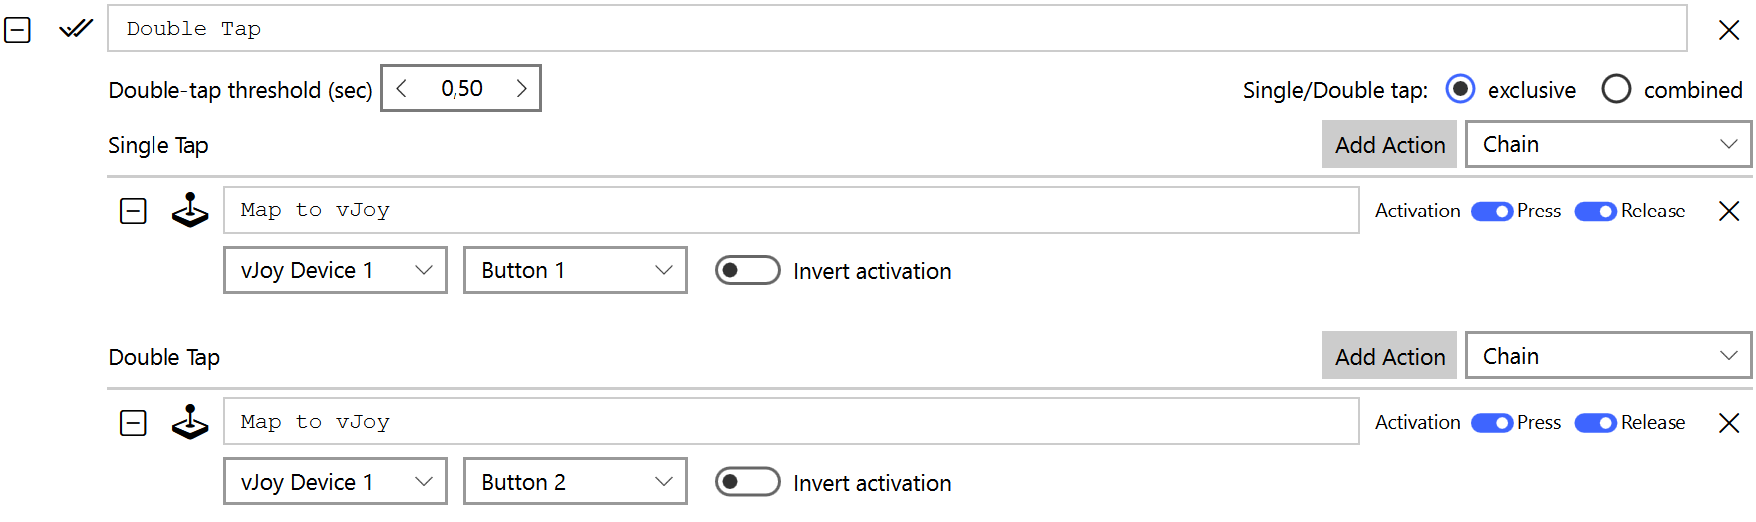
The action executes two different sets of actions depending on whether the button was pressed once or twice in quick succession. The double tap time is configurable. If the exclusive mode is selected the single tap will automatically execute once the double tap threshold is exceeded. Using the combined mode will result in a double tap executing the single tap actions as well.
Dual-Axis Deadzone
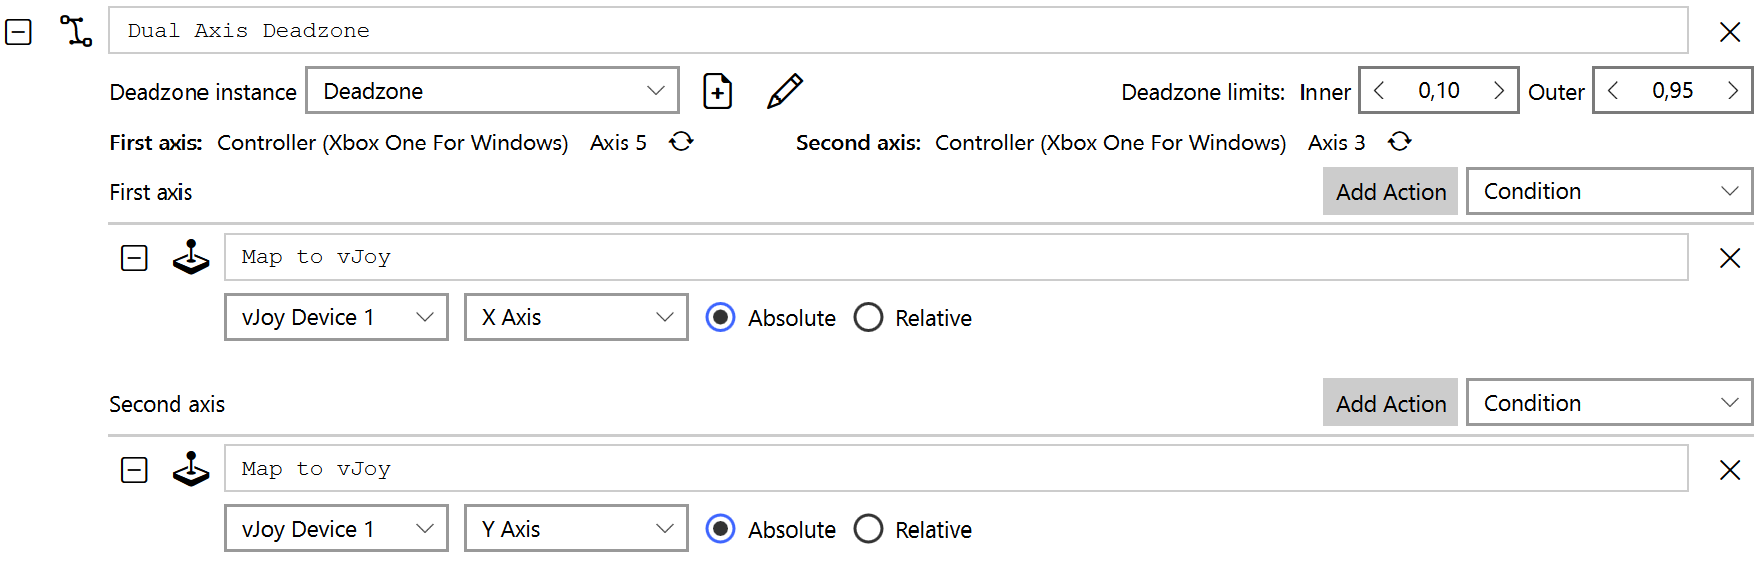
Specifies a deadzone designed to work with coupled axis, such as typically found on the X and Y axis of joysticks. This applies a circular deadzone around the resting point of the axes and a square deadzone around the maximum deflection of the axes. The action is configure by:
- Adding the action to both axes.
- Selecting the same deadzone instance from the dropdown in both actions (the instance can be named).
- Clicking on the small circle arrows next to First Axis and Second Axis to assign the currently selected axis to that slot.
The two sections below for First Axis and Second Axis allow further processing of the axis values such as response curves and mapping to a vJoy device.
Without a Map to vJoy action the deadzone applied by the action has no visible effect.
Hat Buttons
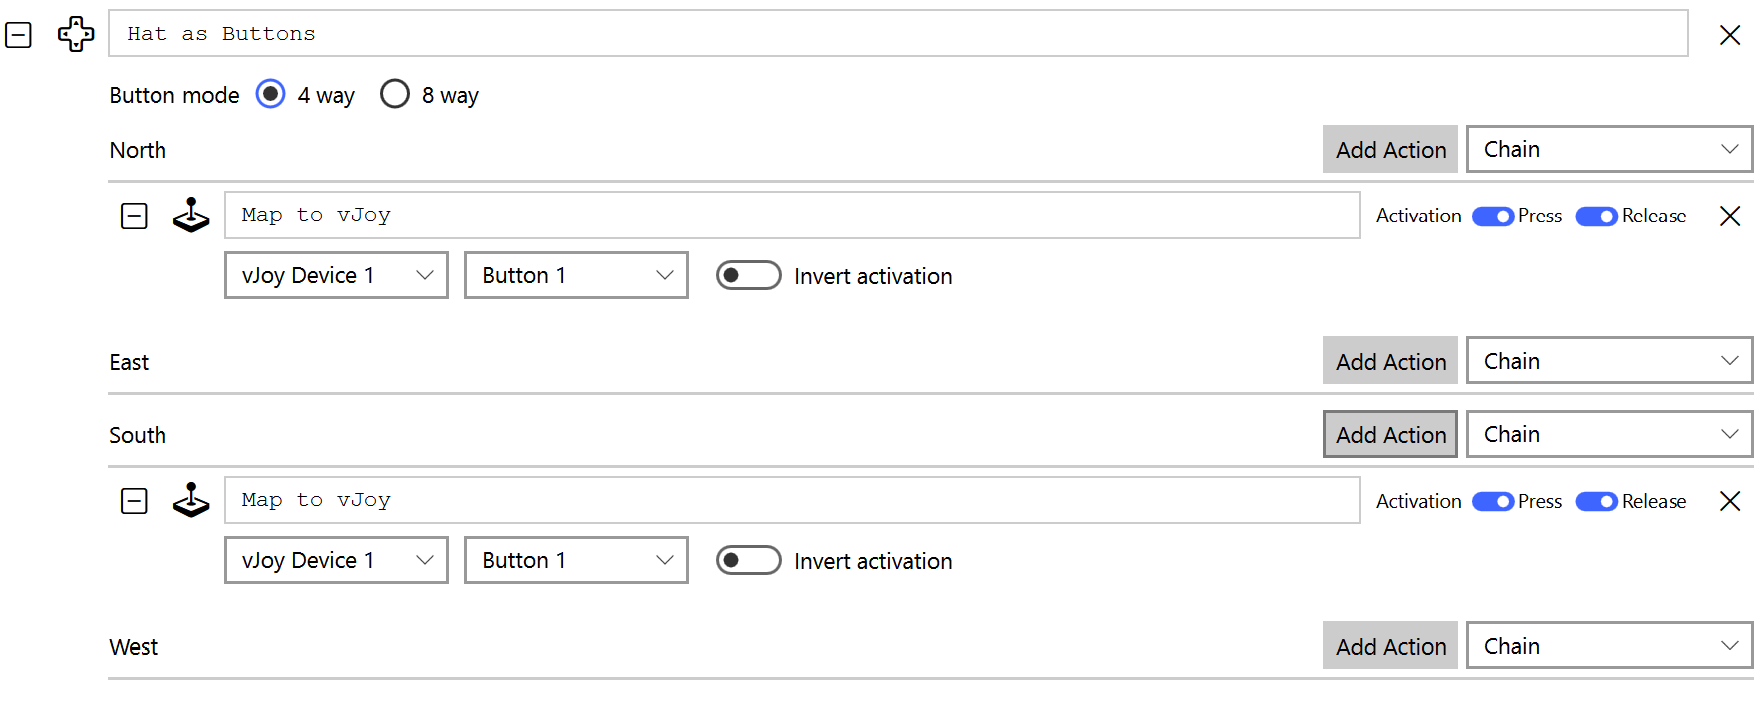
Turns a hat into a set of four or eight buttons without the need to use the virtual button feature. Each of the hat directions can be assigned an arbitrary number of actions that react to button presses and releases.
Load Profile

Loads and activates the specified profile.
Macro

The macro dialogue allows the creation of macros capable of emitting keyoard, mouse, joystick, logical device, and vJoy events with timing information between individual events.
The individual entries of a macro can be reordered via drag&drop while their configuration is done with the data entry fields associated with them. The macro also provides two additional configuration options, Repeat Mode and Exclusive. The Exclusive option ensures that no other macro is running when this macro is executing. The repeat mode allows configuring how, if at all, a macro is executed more than once. The following choices exist:
- None
- The macro is executed exactly once.
- Count
- The macro is executed as often as specified with the specified delay between subsequent executions.
- Hold
- The macro is executed as long as the (virtual) button is held down with a configurable delay between subsequent executions of the macro.
- Toggle
- On the first press of the (virtual) button the macro is started and will repeatedly execute with the specified delay between executions until the (virtual) button is pressed again.
A pair of subsequent entries that do not contain a Pause action between them will have a small pause added between them by the macro system. The length of that pause can be configured in the Settings tab.
Each macro is executed independently, which means that multiple long running macros can have their key presses interfere with each other. This is where the Exclusive option can be useful.
Map to Keyboard

The map to keyboard action allows an arbitrary keyboard key sequence to be linked to a single physical input, such as a button. The two switches allow modifying if the activation behavior. By default the keyboard key is pressed and released in sync with the associated action.
Map to Logical Device

Maps an input to a logical device input. Buttons can control the activation behavior via the differnt switches, while an axis can decide if the change is applied as an absolute value or a relative change.
Map to Mouse

Allows controlling mouse events using axis, buttons, and hats. Buttons can trigger both mouse presses and motions while axis and hat inputs can only control the motion of the mouse.
Map to vJoy


Maps an input to a logical device input. Buttons can control the activation behavior via the differnt switches, while an axis can decide if the change is applied as an absolute value or a relative change. The relative axis option also allows specifying a scaling factor to increase or decrease the amount applied.
Merge Axis
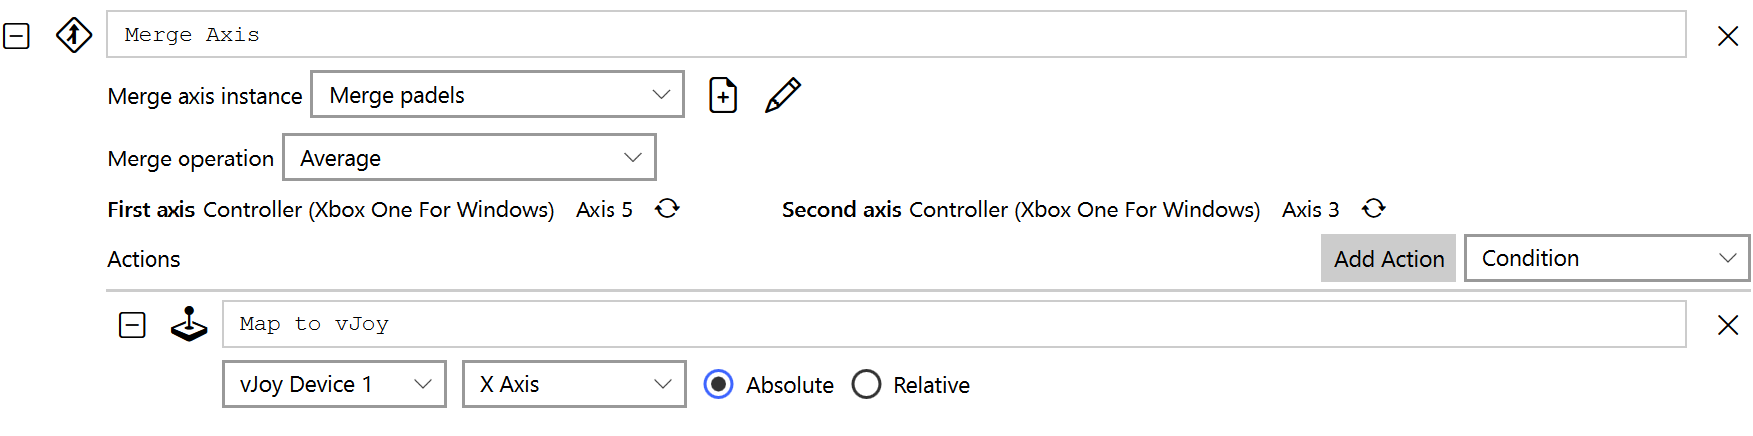
Combines the values of two axes into a single value that can then be processed further by other actions. To use this action perform the following steps:
- Add the action to both axes.
- Select the same merge axis instance from the dropdown in both actions (the instance can be named).
- Click on the small circle arrow next to First Axis and Second Axis to assign the currently selected axis to that slot.
The manner in which the axes values are combined is governed by the Merge operation selected.
- Average
- Compute the average of the two axes values.
- Bidirectional
- Intended for use with pedals, where the average is over two axis moving in the same direction.
- Maximum
- Computes the maximum of the two values.
- Minimum
- Computes the minimum of the two values.
- Sum
- Computes the sum of the two values.
Pause & Resume

This action allows to pause and resume the execution of actions in response to physical input events by Gremlin. When the execution is paused only Pause & Resume actions are executed.
Play Sound

Triggers the playback of a designated sound file. The volume of the playback can be controlled via the volume field.
Reference

This action allows you to select an existing action and to then add that action as either a reference or copy. The two options behave as follows:
- Copy
- Creates an exact copy of the selected action, acting as a starting point for further modifications
- Reference
- Associates the selected action with this set of actions, resulting in changes in all action sets using that action to be mirrored across the entire profile.
Response Curve
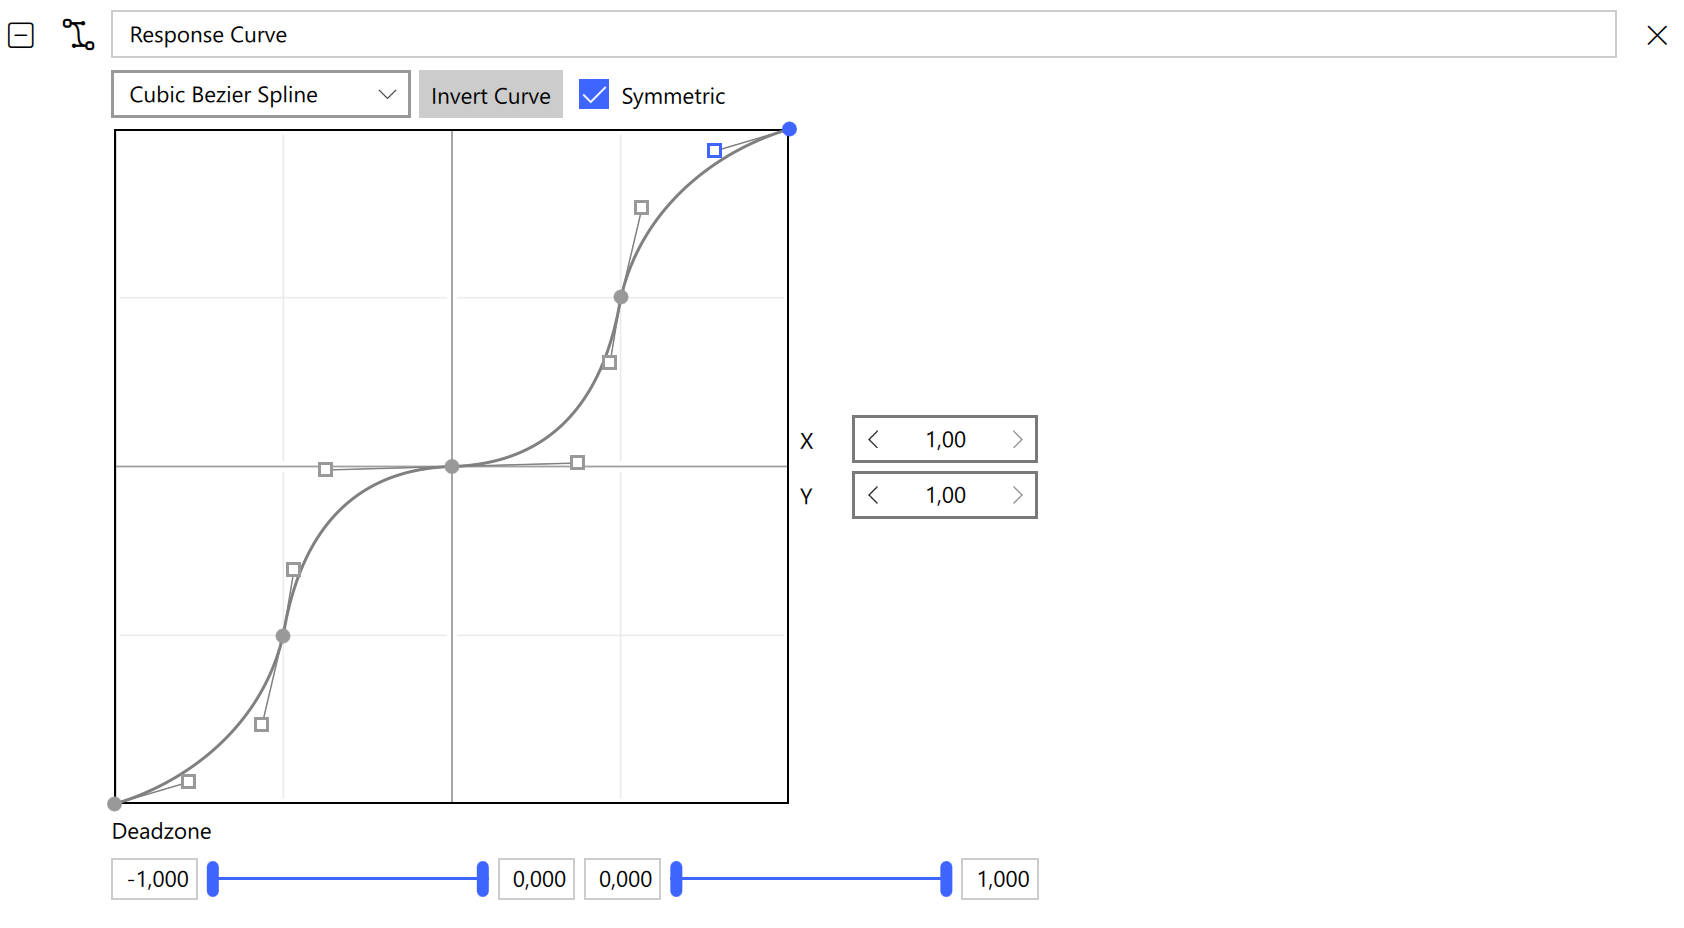
The response curve dialogue allows the customisation of the response produced by the joystick using the curve editor. The shape of the curve is controlled using a set of control points.
A new control point is added by a double left click in an empty area of the curve editor. Removing an existing control point is achieved by selecting the desired point and pressing the Del key on the keyboard. A single left click on a control point will mark the point as active. An active point can be dragged in the window to modify its position. Alternatively, the text fields to the right of the curve editor allow for precise numerical control of the position.
Finally, the dead zones for the axis can be defined using the sliders and input fields at the bottom of the dialogue. The fields and sliders control the full deflection dead zone (1st and 4th field from the left) as well as the centre deflection dead zones (2nd and 3rd field).
Currently there are three types of response curve types available which are selected from the drop down menu at the top of the widget:
- Piecewise Linear
- A set of straight line segments between control points.
- Cubic Spline
- A simple spline with only control points dictating locations the curve has to pass through. No control over the shape is provided.
- Cubic Bézier Spline
- A more complex spline with control points and "handles" that can modify the shape of the overall curve. Importantly this allows to control how the curve approaches the end points of the curve.
A response curve mapping action always needs to be paired with a Map to vJoy action, as otherwise the transformation will not have any visible effect.
Remember that actions are executed in sequence, thus the response curve action has to be placed before mapping it to a vJoy or logical device.
In order for response curves to work properly the game has to be configured to use a linear 1:1 curve, as otherwise the two curve settings will interfere with each other producing undesirable results.
Smart Toggle

The smart toggle container allows for a single group of actions that have on and off states, i.e. Map to vJoy, Map to Keyboard, and Map to Logical Device, to have two different behaviours. If the input is held down the action will perform as a typical Map to X action would, i.e. staying active as long as the input is pressed. However, when a short button press is detected, specified by the Toggle delay, then the first press toggles the down state, i.e. holding the action down, and the second short press releases the action again.
Split Axis

This action allows splitting a single axis into two parts. The value at which the axis is split can be adjusted by the user. Afterwards the two halves can haver be further processed with other actions.
Tempo
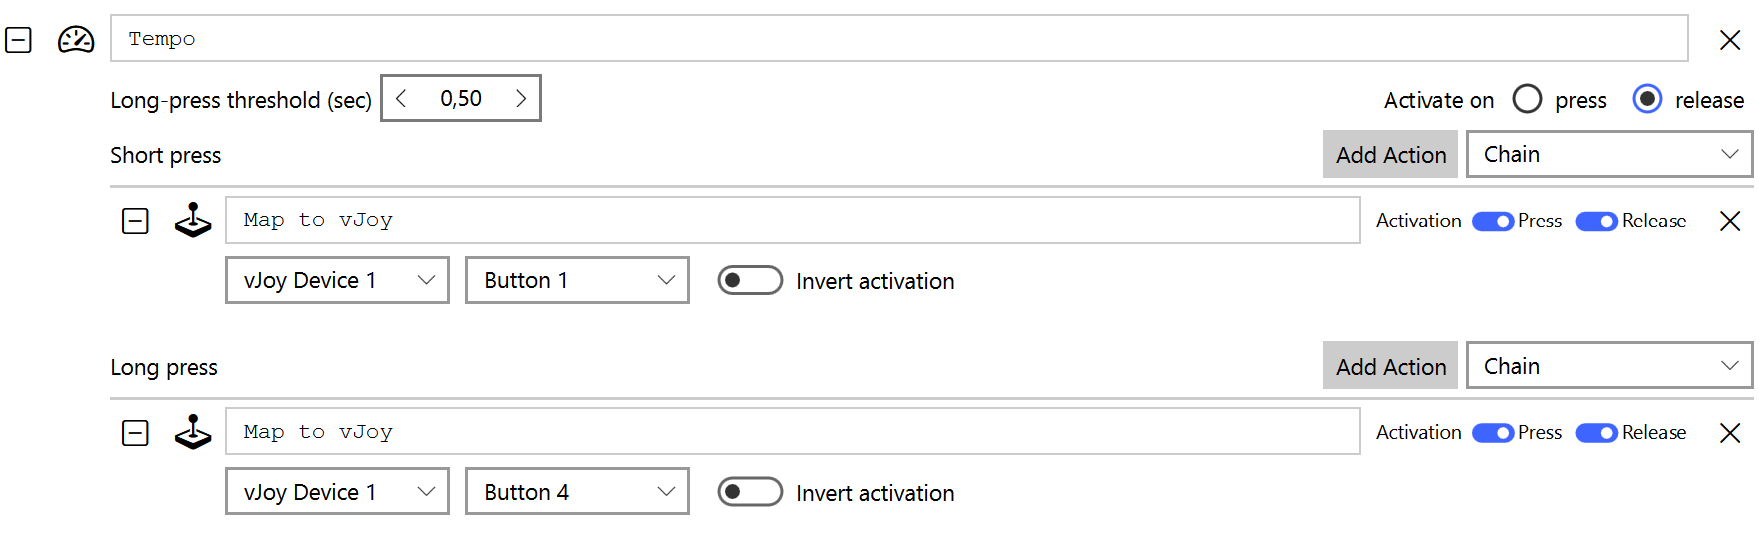
This container holds two groups of actions that get executed under different conditions. The first one is run when the input is pressed for a duration shorter then the specified delay. The second group is run when the input is pressed for longer then the specified delay. Whether the first group is executed with the input being pressed or only when it is released can be controlled by the activation setting.